The feature’s primary purpose is to enable users to give and receive assistance remotely. Therefore, using the feature requires a Giver (someone rendering assistance via a PC) and a Receiver (someone receiving assistance via another PC).
Difference Between Quick Assist and Windows Remote Assistance
The function of Quick Assist is quite like the Windows Remote Assistance feature found on previous versions of Windows. However, both features differ in the following ways:
Quick Assist
The Quick Assist feature:
Is available only on Windows 10.Requires Microsoft account sign-in.Is cloud-based.Requires one outbound connection from the Giver’s PC to the Microsoft server and a separate connection from the Microsoft server to the Receiver’s PC.Users can temporarily pause the assist session.
Windows Remote Assistance
The Windows Remote Assistance feature:
Is available on Windows XP and later versions.Does not require a Microsoft account sign-in.Is based on Remote Desktop technology.The connection can be over a Local Area Network or the Internet.Users can only end and not pause the assist session.
System Requirements for Using Quick Assist
To use the Quick Assist feature, users’ systems must meet the following requirements:
Windows 10 operating system using versions 1607 or higher. Version 1607 was released in 2016.Microsoft user account.Internet connection.
If the system requirements for using Quick Assist are met, then you can follow the steps below to utilize it:
Accessing Quick Assist
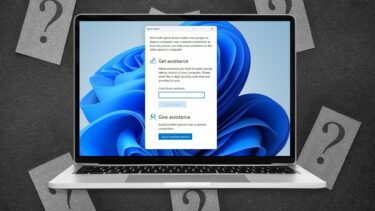
The first step to using Quick Assist is accessing or launching the app. Take the following steps to launch Quick Assist on your computer: Step 1: In the search box beside the Windows icon, input the query Quick Assist. Step 2: Click on Open or press the Enter key on your keyboard. There is another way to also access Quick Assist feature. Step 1: Click on the Start button at the far left-bottom corner of your screen. Step 2: Scroll to the folder named Windows Accessories. Step 3: Click on Quick Assist to launch the app. Using either of the steps mentioned above should launch the app and you can move on to giving or requesting assistance.
Giving Assistance
In this case, you are assisting another individual through a remote connection. Here’s how you can use Quick Assist to do this: Step 1: After the launch of Quick Assist and under the label Give Assistance, select Assist another person. Step 2: Sign in using your Microsoft account details. Step 3: The app should generate a security code. Share this six-digit code with the party requesting assistance before the timer elapses (10 minutes). Step 4: Once the other party enters the code, you should see two options: Take full control or View the screen. Choosing the latter means that you cannot do any work on the other party’s PC while the former allows you to navigate the other party’s PC. Step 5: Select Continue after choosing an option. Depending on the option chosen, once the other party (Receiver) grants you permission from their end, you should be able to view their screen or fully control their PC.
Requesting Assistance
On Quick Assist, requesting assistance requires users to select Get Assistance. Follow these steps if you need to get remote assistance: Step 1: After the launch of Quick Assist, select the label Get Assistance. Step 2: Enter the six-digit code that the Giver (person helping) provides. Step 3: Click on Share Screen. Step 4: Once the connection is established, your helper should see your screen but don’t have permission to work. Click on Allow in the next window that appears on your screen to permit the other individual to work on your PC. It is important to note that Quick Assist is not voice-enabled. However, on Quick Assist, users can communicate by dropping messages on the Toggle Instruction Channel or using the Annotation function to highlight areas for attention. Another option would be to have a phone call.
Using Windows 7 Remote Assistance
That’s it for using Quick Assist on Windows 10. Now, you can offer assistance to friends, family members, and associates through a remote connection. However, if your system does not run on the Windows 10 operating system, you can consider using Windows Remote Assistance, which runs on previous versions of Windows. The above article may contain affiliate links which help support Guiding Tech. However, it does not affect our editorial integrity. The content remains unbiased and authentic.