Before we go ahead, let us make one thing clear. Schedule with social sharing is limited to Canva Pro users only. You can either enroll for a couple of weeks of a free trial or pay for a monthly or yearly plan to get started. If you are a free Canva user, you will see the Schedule add-on greyed out on the desktop, meaning it’s not available to you. In this post, we will first schedule a post from Canva to Twitter using the Canva desktop.
Schedule Social Posts in Canva
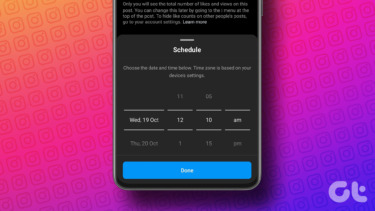
With the Canva free version, you can easily share a Canva creation to many social media networks such as Instagram, Facebook, Twitter, etc. In addition, the Schedule function gives you more power over the sharing. It can also be the perfect tool for someone doing advertising regularly over these channels. You can plan your entire content in Canva and schedule it to your preferred social media account. Now, let’s schedule a post from Canva to Twitter. Step 1: Open Canva on the desktop and log in using your account credentials. Make sure you are using Canva Pro to access the Schedule feature. Step 2: Go through the templates section and pick one that suits your needs. Canva has thousands of ready-to-go templates. If you want to announce an upcoming sale for your product after a week. We will use that scenario to schedule a relevant banner to Twitter using Canva here. Step 3: Pick a sale template and make necessary changes from the Canva editing menu. One can change fonts, colors, add a logo, change the background, and make a perfect flyer to woo followers on social medial. Step 4: When you are fully satisfied with the design, click on the three-dot menu in the upper right corner. Step 5: Select Schedule. Step 6: Select the Date and Time on which you want the post to go live. Hit Next at the bottom. Step 7: You will see your preferred date and time at the top. Select a channel and click on your preferred social media channel from the following menu. Here, we are selecting Twitter. Step 8: Canva will ask you to connect the select social media platform to publish the post at a selected time. Step 9: Authorize Canva to access your social media account. You will see your profile picture with your social media account in Canva. Step 10: Select the Canva content type like PNG, GIF, or MP4 Video and write your Tweet below in 280 characters. Step 11: Hit Schedule post, and your post is all set to live on the selected date and time on your preferred social media channel. Canva will ask you to make a copy of your banner, and you can peak at Content Planner as well.
How to Edit Scheduled Social Posts in Canva
Your sale post is about to schedule two days from now. But now you want to change the discount from 50% to 60% and edit the time for the post to go live. Here’s where Canva’s excellent Content Planner comes into play. It offers a monthly calendar view and showcases which social posts are about to go live shortly. Follow the steps below to learn how to use Canva Content Planner to edit scheduled social posts. Step 1: From the Canva home, you will notice Content Planner on the left side. Click on it. Step 2: Click on the Scheduled post that you want to edit. Step 3: Click on the three-button menu beside the time and date. Step 4: The drop-down menu will allow you to change date and time, edit a design, and even remove posts from the content planner. Step 5: Click on Edit this design. Canva will warn you about the rescheduling of the post. Step 6: Make necessary adjustments from the familiar editing interface and reschedule the post using the steps above. At any point, you can easily edit, remove, change the date and time of the scheduled social posts using the Content Planner menu.
What About Canva Mobile
The whole graphic design creation and scheduling are best served on the web. However, Canva hasn’t forgotten mobile users as well. The Schedule function is available on Canva mobile apps as well. Make a final design in Canva and tap on the Share menu at the top. Then, scroll horizontally and find the Schedule option. Click on it, select date and time, select social media channel, and you are all set to schedule social media posts from Canva mobile.
Plan Your Content in Advance
Canva’s scheduled social sharing is a boon for marketing agencies, influencers, and business users. You can plan your social media strategy and don’t have to worry about missing the moment with the scheduling function. How are you planning to use the Schedule function in Canva? Share your views in the comments below. The above article may contain affiliate links which help support Guiding Tech. However, it does not affect our editorial integrity. The content remains unbiased and authentic.