While searching for important files, such delays can disrupt your workflow and leave you frustrated. To help you out, we’ve compiled a list of 6 working solutions that should help fix slow search on Windows 11. So, let’s check them out.
1. Restart Windows Search Service
Windows Search service is a small program responsible for providing search results for files, mail, and other important content. If the service encounters a problem, the search tool will not function properly. To fix it, you’ll need to restart the Windows Search service by following the steps below. Step 1: Press Windows key + R to launch the Run command, type in services.msc, and press Enter.
Step 2: In the Services window, scroll down to locate Windows Search. Right-click on it and select Restart from the menu.
Try searching for a file with the search tool to see if it’s working as expected.
2. Restart Windows Explorer
Windows Explorer is a process that provides a graphical interface for the Start menu, Taskbar, and File Explorer. If there’s an issue with these utilities, the search tool may take longer than expected to fetch results. In that case, you can restart Windows Explorer from the Task Manager to see if that helps. Step 1: Press Ctrl + Shift + Esc on your keyboard to launch the Task Manager. Step 2: In the Processes tab, locate Windows Explorer. Right-click on it and select Restart.
The Taskbar will disappear for a few moments and then reappear as you do that. Try using the search tool again to see if the issue is resolved.
3. Run Windows Search and Indexing Troubleshooter
Windows 11 offers a troubleshooter for most utilities. If the Windows search is unbearably slow, you can run the search and indexing troubleshooter on your PC. Step 1: Right-click on the Start menu and select Settings from the list.
Step 2: In the System tab, scroll down to click on Troubleshoot.
Step 3: Select Other troubleshooters.
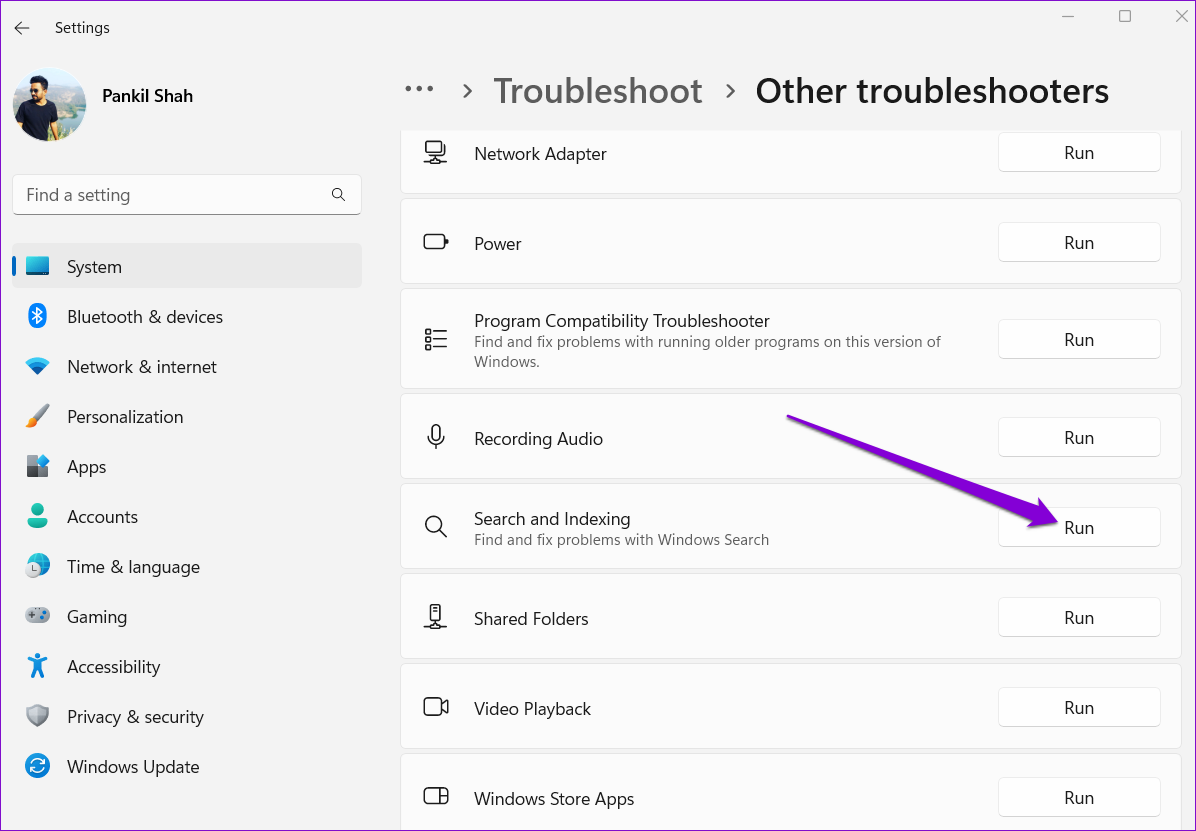
Step 4: Click on the Run button next to ‘Search and Indexing.’
From there, follow the on-screen prompts to finish the troubleshooting process.
4. Disable Web Search in Start Menu
Apart from your apps, files, and other documents, the Windows Search tool also allows you to scour the web directly from the Taskbar. However, this feature is also known to slow down your PC or cause Windows to crash at times. Hence, you can try disabling web search in the Start Menu to see if that improves the situation. Step 1: Press the Windows key + R to launch the Run dialog box. Type regedit in the box and press Enter.
Step 2: Copy and paste the following path into the address bar to navigate to the Windows key:
Step 3: Right-click on the Windows registry key, pick New and select Key. Name it Explorer.
Step 4: Right-click on Explorer, select New and choose DWORD (32-bit) Value. Name it DisableSearchBoxSuggestions.
Step 5: Double-click on the newly created DWORD, change the value data to 1 and hit OK.
Restart your PC and check to see if the search tool can fetch results faster.
5. Modify Indexing Options
Indexing the contents of your PC allows Windows to locate your files faster. And the search speed on Windows depends on the number of files you have on your PC. However, if you don’t search for files and folders in a particular drive, you can exclude them from the indexing list to speed things up. Here’s how. Step 1: Press Windows key + I to launch the Settings app. Select the Privacy & security tab from the left column and pick Searching Windows.
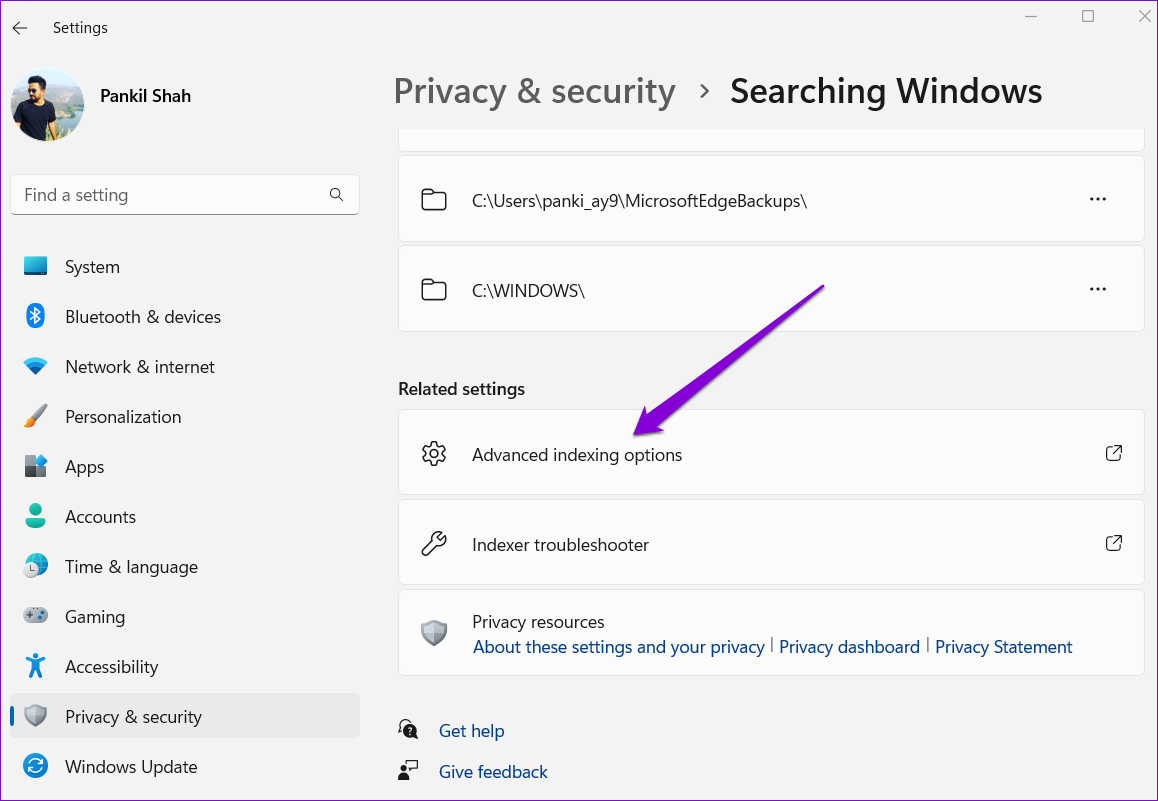
Step 2: Scroll down to click on Advanced indexing options.
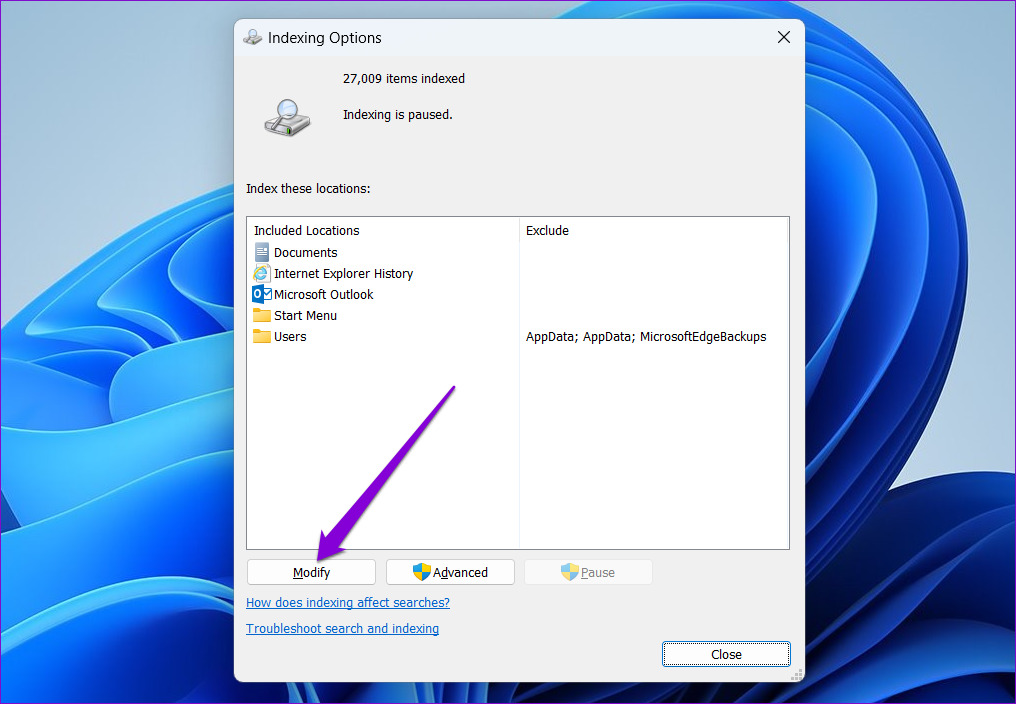
Step 3: Click on Modify.
Step 4: In the Indexing Locations window, uncheck the folders or drives you want to exclude and hit OK.
After that, restart your computer and use the search tool to see if it loads faster.
6. Rebuild the Windows Search Index
Lastly, if the search on Windows is still slow, there might be an issue with the search index library on your PC. In that case, you can try rebuilding the index from scratch. This process may take a few hours to complete, depending on the number of files that are being indexed. Step 1: Press the Windows key + S to open Windows search, type in indexing options, and press Enter.
Step 2: Next, click on Advanced.
Step 3: Lastly, hit the Rebuild button under Troubleshooting.
Wait for Windows to complete the indexing process. Again, this may take a while, but you can continue using your PC.
Search Efficiently
You may find issues with the search tool in almost all versions of Windows. Thankfully, there’re a few steps you can take to improve your search experience on Windows 11. So, go through the above steps and tell us which one helped you the most in the comments below. The above article may contain affiliate links which help support Guiding Tech. However, it does not affect our editorial integrity. The content remains unbiased and authentic.


